Lincoln Mark V Lincoln Tech
Lincoln Technical Articles to help you keep your Lincoln running perfect.
FINDING OFF THE RACK WHITE WALL TIRES - August, 2012 - by R. Cass
Recently I needed some good white walls for my 79 Lincoln Mark V. I had just bought this car and I took it up to Discount Tire to have the Michelins that were on it rotated and balanced and they informed that they were made in 1990!!!! I handnt even checked the date on them because they looked perfect and the tread was thick and had not one crack. Time for some new ones.
Im sure we all know that Michelin stopped producing white wall tires in the P235/75/15 and under size a few years back. There are less and less manufacturers of off the rack white walls.
Here is what I found in my recent search. Firestone makes a good P235/75/R15 tire that looks nice and is a good width call the FR380. You can buy these at any Firestone store and they have good Temp and Tread ratings and a 65k mile warranty. I chose these tires for the Lincoln since it was at least a tire Ford used back in that era. They were reasonably priced at 75 each. Installation was free and they were also offering a buy 3 get one free sale.
The other maker that I found was the Cooper Trendsetter. It is a nice looking tire and seems to have a good width but it is a lesser quality tire than the Firestone with only a 45k mile warranty. Tread and temp ratings were about average. They were cheap though at $63 each. The Cooper dealer will install a set out the door for $420 tax title and license.
The only other off the rack manufacturer is Mastercraft Tires. They make a nice P235 White Wall called the A/S IV. Prices I found on these were around $75 bills each. They have a 40,000 mile warranty with average tread and temp ratings.
These were the only manufacturers that I found and I checked them all that still produce off the rack White Wall tires. ALSO very important. MAKE SURE if you buy these tires that you check the Tire Manufacture Date on the side of each tire. Firestone gave me two tires that were produced in 2011 which was fine but also tried to sell me the other two that were produced in 2008!!!! Thats 2/3 of its life nearly gone. Time is far more important on a tire than tread wear when dealing with antique cars.
There is another alternative to the above but it is more costly. That would be Diamond Back Classics in Conway, SC. 888-922-1642. These follks have been in business a long time and produce quality white wall tires in their own shop from any tire brand that you want. If you want Michelin X white walls for your 70s Lincoln then they can make them.
I had them make the very special Dual Band White Wall Firestones that came originally on my 78 Lincoln Mark V Diamond Jubilee. They did a superb jot and the white wall material is guaranteed NEVER to turn yellow and after a year they are still white as can be. These tires ran right at 900 for all five tires including shipping. It figured out to be about 60 bucks more per tire to have them make them. American Classic and Coker also carry nice but expensive P235 WWs.
Hopefully this will give you a bit of help finding those great old white walls for our rolling palaces at a reasonable price and at a convenient local store!!
1978-1979 SEAT BELT CHIME REPAIR FOR LINCOLN CONTINENTAL, CONTINENTAL MARK AND LINCOLN VERSAILLES - November, 2010 - by R. Cass
There is nothing better than to hear the gentle reminder to fasten your seat belt chime upon starting your 1978 or 79 Continental Mark V. This unique and optional chime was introduced on the 1978 Mark V and specifically for the Diamond Jubilee Edition. All car lines received the chime as an option.
The chime itself operates on the old doorbell premise. In fact it is more or less an old door bell with an electrically operated tomboli that moves up and down striking a tuned and pretty sounding xylophone key. The unit is located on the far right side of the dash just to the right of the glove box on Mark V. A flasher type switch much like your turn signal flasher is attached to the chime unit that allows it to operate on and off or up and down in this case.
A timer also operates how long the chime will operate. In 1978 the chime would operate a full five chimes or hits of the tone key. In 1979 this was increased to 8 chimes. The FASTEN BELTS light will also be illuminated while all of this is going on.
Most of these chimes have long since stopped working but they are repairable with a little work. What generally happened was that people would fasten their seat belts upon entering the car and BEFORE turning on the ignition switch which is what activates the seat belt timer. If the belt is fastened it stops the chime from working and extinguishes the FASTEN BELTS light. What then would happen over time would be if any moisture was ever present in the car it would leave tiny droplets on the the chime tomboli inside of the unit which in turn would cause rust which finally put a quick end to it ever operating again without some intervention. Dealers would simply change out the unit since it is a sealed unit. 99.9 percent of the time this is why your chime is not working. Its important to let the chime, once it is working to completely, run through its chime sequence BEFORE fastening your seat belt. This keeps the tomboli clean and rust free.
You can remove the chime from the car and remove the outer side of the case of the unit. I would recommend removing the glove box on the Mark V so you will have free and clear access to the chime to its right. Two screws hold it in on the bottom of the dash support. Once out you will see that the lid is glued on. Use a large screwdriver and start prying the lid off carefully starting at either side closest to the xylophone key - there is a small indention there you can get your screwdriver into to start the prying and breaking up of the glue. Some are easy others are not. Once you get it started you can get your screwdriver in and work it all the way around the lid.
Once this is removed you will see the tomboli and most likely it will be stuck in the down position. Generally you can turn it upside down and carefully thump it on the palm of your hand and get it released to where it will move up and down. In the down position take 1500 grit sandpaper and begin lightly sanding the tomboli slowly turning it to ensure you get all the way around it. You should remove any and all rust or bumps etc and it should be nice and shiny silver and smooth as glass. You can now take the unit and move it up and down and see the tomboli move up and down freely. Keeping the tomboli free of rust will keep the chime operating as it should.
You will also see that the sponge that prevents the tomboli from making a thunking noise on its travel back down will be rotted and in little pieces. Remove this and use doubled felt with silicone to make a pad that the tomboli will land on quietly. Make sure that you make a kind of nest with your fingertip so the tomboli will travel its full length. If the felt is to high because of the silicone bead you put in between the felt it will not allow the tomboli to strike as hard as it needs to. All of this sounds complex but it isnt and once you see it this will all fall into place.
Once you have a working chime - test on the car before putting back together - glue the lid back on with 4 dots of silicone around the edge. No more is needed in case you need to get back in at some point. You shouldnt if you let the chime run its course before fastening your belt.
Two other problems could emerge with the chime. Turn on the ignition and make sure that the FASTEN BELTS light is working and stays on for a few seconds. If it is out then you have another problem and the chime still wont work. Remember, I spoke of the flasher on the side of the chime. It is a 1 inch round silver pellet taped to the wiring harness at the chime unit. This unit is most likely your problem. These are readily available at your local junk yard on another chime equipped car.
The second problem that may hamper your chime repair is the ground at the drivers side seat belt. There is a ground wire that is attached to the car body at the seat belt retractor on the floor. You may have to take up the carpet just a bit and remove the retractor to make sure this ground is still screwed down securely OR has not been broken in to. Often times during production the wire would get squished between the floor and the carpet and retractor. If the ground isnt grounded then the chime wont work either. Also make sure the ground plug is snapped in place on the seat belt retractor.
Hopefully this will get your chime dinging again!!
SHAKE RATTLE AND ROLL - February 19, 2011 - by R. Cass
Ridding Yourself of Three Irritating Rattles in 1977-1979 Continental Mark Vs
The 1977-1979 Continental Mark V was a very well built Lincoln. Quality control standards were some of the highest in the industry and great care was taken to ensure a problem free automobile. It is not uncommon to hear of these cars running upwards of and over 200,000 miles. As with any automobile some bothersome rattles will their ugly heads over time from the continuous movement of the car body while in operation. I have pinpointed three aggravating but relatively easy to fix noises.
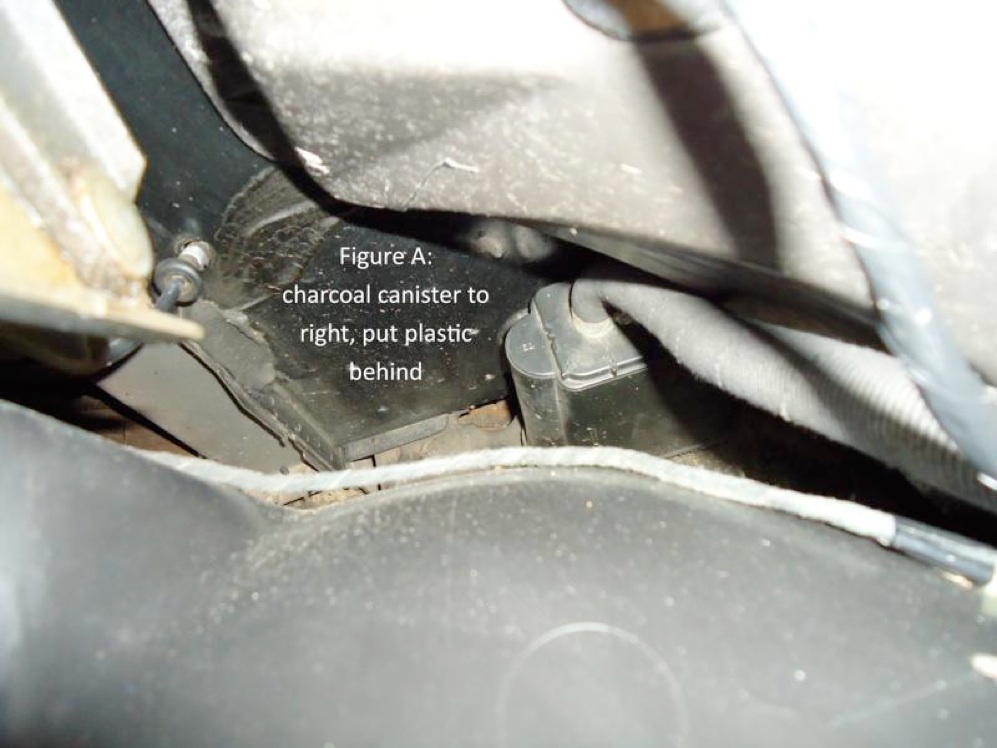
The first rattle that I have found to show up after operating over some good sized pot holes is the emissions charcoal canister (Figure A). The Mark V features two charcoal canisters one at the front passenger side of the car just below the alternator and another, which is the one we are concerned with, is mounted again on the passenger side right on the firewall below the antenna. This canister is mounted to the firewall at the top of the canister with a bolt. The bottom of the canister has a tab that slips into a tab that sticks up on the frame. What happens is that this tab is loosened by the continuous movement of the canister and finally it allows the canister at the bottom to rattle. Its especially heard when hitting a pot hole and at times , if loose enough, can be heard from just small road aberrations.
It is an easy fix although it may take some body contortions to get to the canister unless you have a lift. If you don't have a lift you can get on your back just behind the passenger side front wheel and wiggle under the car until you are on the other side of the frame - If you look up you will see the canister mounted to the firewall. You might be able to access it from above in the engine compartment by reaching down by the air conditioner evaporator unit housing. What you are going to do is slip a 1/4 inch thick by 3 inches long piece of stock plastic behind the canister and between the tab and canister at the bottom of the canister. I used a little bit of silicone to keep the plastic strip in place. This will tighten the canister up and stop the rattle. Putting foam or other water holding items may cause rust and is not recommended for this job. Your biggest problem will be getting under the car to access the canister.
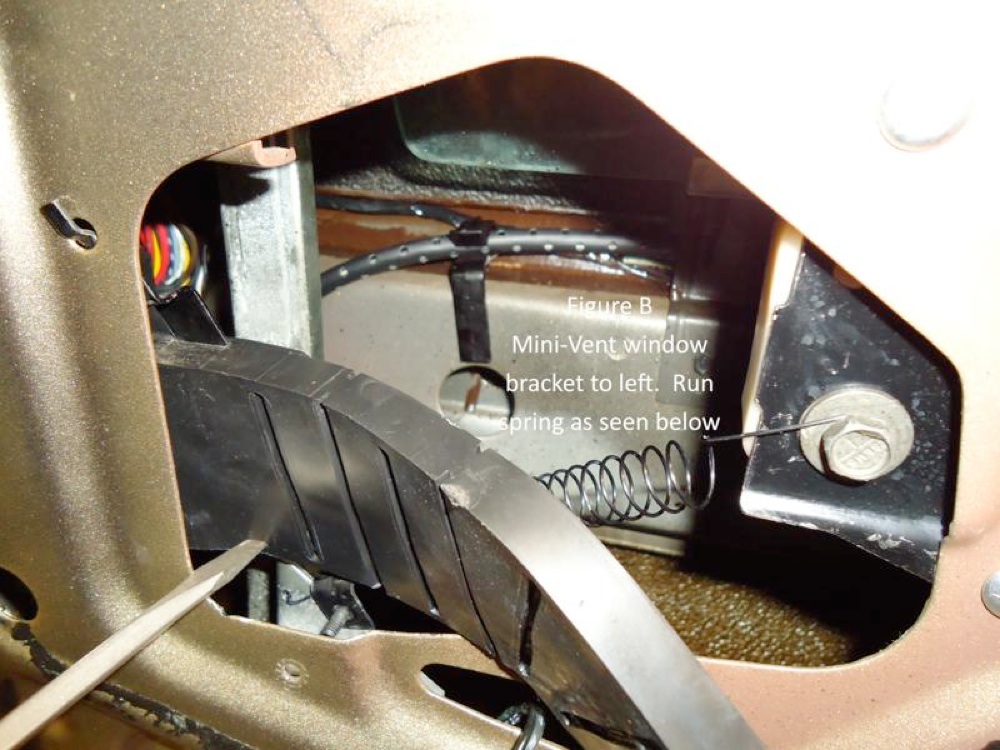
The second rattle is also on the passenger side but this one is inside of the door on power Mini Vent window cars (Figure B). Have you ever come to a quick stop and heard what sounded like a book falling off of a shelf? Well if you have your culprit is the front track for the power mini vent window. This track is a free floating track that can move front to back about 1 inch as the mini vent goes up and down to allow it to move freely and smoothly. The track is attached to the frame via a rubber limiter and bracket. It is this rubber limiter and bracket that make that noise as the track moves back and forth on it. As the car stops the track moves forward and you have your book falling sound. Generally as you take off it wont create as much rear inertia unless you are heavy footed and you dont hear it return to the rear position. This sets it up to make the same racket at the next stop.
This always seems to happen with the right side door only. There is a similar setup on the drivers door but oddly the limiter and bracket are made a bit tighter and it generally wont do that. If it does you can use the same method I am going to outline here. All you need is a spring and a drill. Remove the door panel trim and paper water shield. Look at the opening into the door just above the speaker where the thick door wiring harness comes out. Just to the left you will see the silver power Mini Vent track that is causing the problem. Move the bracket front to back and you will immediately hear the noise that has been bugging you at nearly every stop.
The spring that I recommend using is the same spring that is used on the carburetor transmission passing gear rod. Its just perfect to fix this problem. You can get one of these at the local wrecking yard or many auto parts stores will have some sort of spring that you can use. It needs to have a hook on either end and not be a very tight spring. The spring will be attached to the bracket on the Mini Vent track and then hooked forward on a bolt on the door. You will see the bracket attached midway to the to the Mini Vent track. You will need to remove the nut that holds the door wire harness and move it back out of the way so you can access the track bracket. There is a section of the bracket that is parallel to the track. This is where you will drill your hold for one end of your spring to attach. Drill a 1/16 inch hole about 1/4 inch down on the bracket. Be sure and vacuum the metal shaving out of the door bottom or run an extend-able magnet or put a rag under the drill area to catch the shavings.
Now simply attach the spring to the newly drilled hole. On the opposite side of the access opening (see Figure B) you will see a bolt. Loosen this bolt and slip the other end of your spring under the bolt head and the washer and tighten back to 15 ft/lbs. You have now fixed your rattle. This spring will keep the track from moving back and forth during stopping but will allow the track to still work back and forth as intended as the Mini Vent goes up and down. The spring should just keep the track in place. If it is to tight push outward on the spring in small increments to loosen the tension if necessary. Sounds complex but it isn't once you see what I am talking about. Make sure when you put the door trim back on that you first put the paper water shield back in as it is treated on the inner side to prevent water from damaging the trim panel.
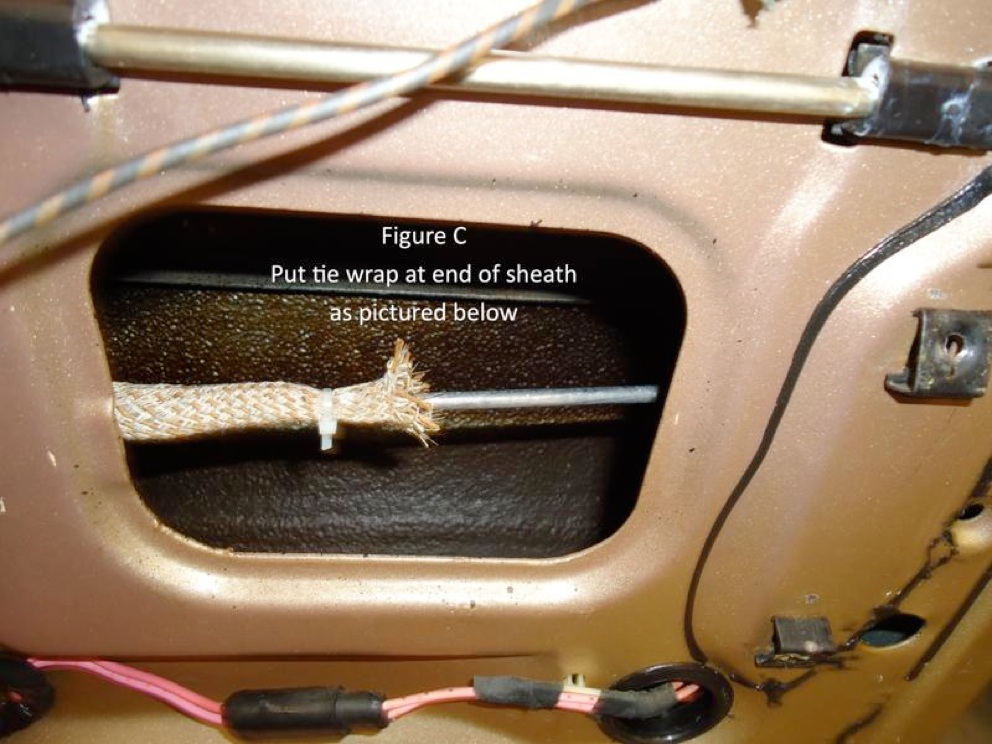
The third and final rattle on your Mark is once again in the door (Figure C). While you are fixing the rattling Mini Vent track you can also fix this rattle. When you close the either door you may from time to time hear a metallic rattling sound. This is the rod running from the door handle back to the rear latch. It runs very close to the door panel and will get against it and rattle. It can also make noise over road bumps. Again with the door trim panel and water shield removed look at the opening into the door closer to the rear of the door back from the door handle. Here you will see the door handle rod. There will be a fabric sheath that you should see that fits around and insulates the door handle rod.
What happens with use of the door handle the sheath starts moving to the rear of the door. I have seen them completely bunched to the rear of the rod. This sheath prevents the rod from rattling on the door panel. All you need to correct this problem is a tie wrap. First move the sheath all the way forward to the door handle. You may have to work with it to get it moved up as far as it needs to go but you will see from the access holes around the door handle when you have it up to the rear of the door handle. Once you have the sheath worked all the way forward the back of the sheath should be about midway on the rod at the rear door access panel. Take your tie wrap and put it around the sheath about one inch back from the end of the sheath. Tighten the tie wrap as much as you can and clip off the excess. This will prevent the sheath from moving backwards every time you operate the door handle. Metallic rattle fixed.
Now you can motor in rattle free silence in your Continental Mark V.